Sunday, April 30, 2006

Ology Books


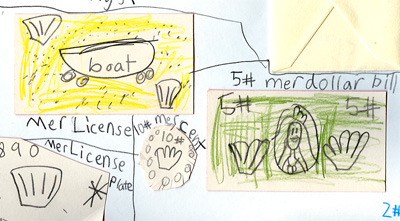
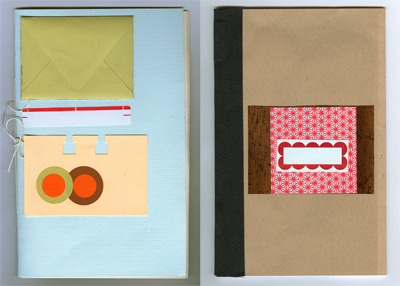
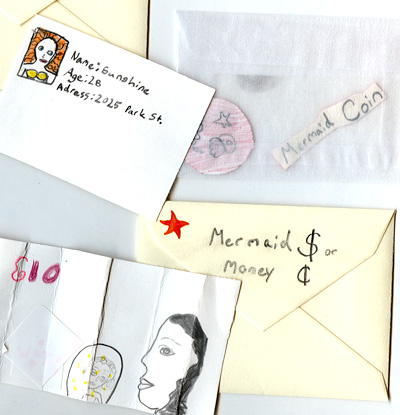
We are big fans of Candlewick's "Ologies" series, which include Dragonology, Egyptology, and Wizardology. The fanciful mix of history and fantasy in these books is coupled with an inventive design that includes messages hidden inside envelopes, behind flaps, in glued-in booklets, and more. We made our own Mermaidology books. Shown here are details of pages about "Mermaid Society," by Isabella, age 8, and Ruby, age 7. The girls spent three hours on this project, engaged not only with the visual side, but with the writing and mythologizing.

Cards for a wedding shower


We made a series of cards for a wedding shower. The kids "colorized" pages of clip art from a Dover Victorian Women book (we used water colors). Then we cut the images out and added them "zine" style to sheets of cardstock with a simple preprinted message prepared by Mom, including words in a fancy bracket (digital clip art) on the inside:


and the same bracket blown up on the outside:


The cards formed a nice series together, each one different yet sharing a similar style and set of materials.


This would be a fun way to make a set of invitations for a party, or thank-you notes, or valentines.

Thursday, April 27, 2006

Generators


TheGenerator Blog is a great collection of generator sites that let you put your own text into different graphic and literary forms. Make your own brand, or write a funny Oscar acceptance speech, or print out your own FBI button. It's a great way to play with templates, explore the visual landscape, exercise your verbal and visual wit, and make cool stuff.

Tuesday, April 25, 2006

Decorated Books


Make a soft-cover book by sewing together pages or stapling them with a long-necked stapler. Use tape, stickers, labels, envelopes, and collage elements to make your own variations of classic bookbindings. Ruby, age 7, made these books. Download instructions (pdf).

Thursday, April 20, 2006

Of zines and clip art


Coloring books and crayons are for little kids. But good clip art, recovered from old prints and engravings, and jazzed up with watercolors, is another matter. You get to retrace the design principles of an earlier era, and you can really focus on the properties of the paint. We made ours into zines afterwards.

Art: Dover clip art, Women: A Pictoral Archive from Nineteenth Century Sources.
Painting and zine by Lucy, age 6.

Sharpie drawings

A pad of half-sized construction paper and some new black Sharpies can produce some nice line art. Draw your mother or a friend from the back for a contemplative effect:

or make creepy characters, like this ghostly rocker (her band is called the Death Valley Girls):

You can also use color selectively, adding red for gory effect. This baby dracula was cut out and pasted to another sheet:

Sharpie drawings scan well, so that you can make magnets, t-shirts, mugs, or a nice web posting with your favorite drawings.

Art by Hannah and Ronnie, age 9.

Saturday, April 15, 2006

Tagging


We had fun with the animal tag project today (see Stuffed Animal Party on this site). Five kids aged 6-9 worked for over an hour naming, licensing, tagging, and then playing with their stuffies. Izzy, age 6, discovered that the tags also make nice paper lockets for kids to wear.

More Roundlings


Inspired by the Reinhard roundlings posted below, made from office dots, here are two versions by Jay and Ruby.

Friday, April 14, 2006

Name Art


Draw a special character for each letter in your name. Some pictures can be an object that starts with that letter (R is for Rabbit). Others can be an object shaped like the letter, or just a fancy design. Ruby and Jay drew their letters on square stickers and put them in a hand-made accordian book.

Thursday, April 13, 2006

Do you know the Marshmallow Man?


Make aliens, robots, fat ghosts, and fake food using craft marshmallows and office supplies. We used thumb tacks, push pins, and Sharpies. We haven' t tried real marshmallows yet!

Roundlings: Designing with Color Coded Stickers


Or make a scene:


You can also cut out your favorites and reposition on a new sheet:


We used 6 inch square card stock from the scrapbooking aisle. You could also use origami paper for the background. Blog reader Maia did a similar project with an Easter theme: chicks and eggs on pastel index cards. The secret lies in the simplicity.

Wednesday, April 12, 2006

Apologies to Maia

My children stumbled on the administration page for this blog and deleted my most recent posts. My apologies, Maia, for the sudden disappearance of your comments!

Tuesday, April 04, 2006

Photomontage


Find pictures in Google and put them together into new scenes. Artists and designers invented this technique in the 1910s and 1920s, using printed photographs. They called it photomontage. Today, you can do it digitally or with pictures from magazines. Ruby, age 7, made this montage with Photoshop.

Monday, April 03, 2006

Playing with Your Food


Out to lunch? Nothing to do? Pull out a Sharpie and make characters out of ketchup packets (or sugar, or any other disposables at hand). Yes, game may end with dramatic deaths of your dolls.

Featured work by Lucy (top) and Izzy (bottom), age 5.

Sunday, April 02, 2006

Designing with Books


Kids want to be producers, not just consumers. When my 6-year old triplets read a book, they often clamor to "do a project" afterwards. This works best with books that use design principles like collage instead of high-level drawing and painting.

This week, it was Gerald McDermott's Anansi the Spider, which combines African folk motifs with international pictograms, tied together with text in Helvetica. Multi-Cultural Modern, circa 1972.


We used 12" by 12" paper (from the scrapbooking aisle), plus strips of paper and round color-coding labels. We tried it at home first, and then went public in their kindergarten class. The teacher appreciated the literary tie-in!

Camera Games: Picture Day


Here's a group game you can play using your camera. Pretend it's Picture Day at school. Find a well-lit wall to use as a backdrop. Dress up for photos (crazy or serious, as the mood strikes you!). Take turns taking pictures of each other. If you're using a digital camera, you can develop them afterwards on the computer, creating contact strips. You can even design folders or envelopes for the finished photos.

Variations: Fashion Shoot; Rock Band Photo Session.

Design a Shirt Together


Give everyone at your gathering a blank 3-x-5 index card or a half-sheet of paper. Draw a tiny picture, word, or squiggle on your card, and then pass it to your neighbor. As the cards move around the table, they get covered with bits of grafitti—hearts, puppies, curlicues, skulls, aliens, names, whatever. After all the cards have gone around a few times, lay them out and pick the best one. Scan the design, print it out on t-shirt transfer paper, and apply to shirts (Mom's help needed for this part). Seven-year-old girls produced this design.

For a simpler project, pass around tote bags and draw directly with Sharpie's. Everyone goes home with a cool tote!

Pattern Design


A pattern uses the same elements over and over. Patterns are one of the oldest forms of decoration. Anything can be a pattern: dots, stripes, or cherry pie! We made these patterns by drawing simple pictures many times on one sheet of paper.

To give our patterns a printed look, we gave them colored backgrounds in Photoshop. To do this, we scanned them and selected the white backgrounds with the "magic wand" tool. Then we picked colors that look good with our drawings. You can also make patterns in Photoshop by copying one image over and over again. Patterns by Hannah, age 9; and Ruby, age 7.

Re-Composition Books


Get some notebooks from the office supply store, and make your own covers. We used photocopies of botanical illustrations by Maria Sibylla Marian, an artist and scientist who lived in Germany in the seventeenth century. We colored in the pictures with markers and added tape, office dots, and other stuff to make the covers exciting. We cut windows in the covers, so that you can see a picture glued to the first page of the book.

6-year-old girls needed help with this project; 9-year-old girls did it on their own (with help from Mom cutting out the windows).

Stuffed Animal Party


Stuffed animals make a great theme for a kid's party. Invite your friends to bring a special stuffed animal. Plan games and activities that involve the animals. At our party, we made pet tags using metal-rimmed key chain tags from the hardware store, tied on with ribbons. We also made identity card magnets and pet-care blankets from scraps of fabric. Between craft activities, we played with the animals. Everyone went home with neat new stuff for the their pet (but of course, no one wanted to go home, because we were having so much fun!) This party was for girls, age 7-8. Pet tag concept by Ruby Miller, age 7.